
A fade may seem simple, but when done right, it can instantly give you a clean and stylish look. Whether you’re looking for a sophisticated hairstyle perfect for the office or a trendy style to show off on the streets, a fade provides the perfect transition and a fresh feel. The key is to achieve a natural transition without hard edges and a layered look.
If you think fading is as simple as “just grab a clipper and push it up,” you’re mistaken. Actually, there’s a lot of skill involved in creating a sophisticated fade. Don’t worry, this article will help you master these techniques step by step, even turning you into a master haircutter from scratch.
1. What is crossfade? Who is it suitable for?
What is a fade?
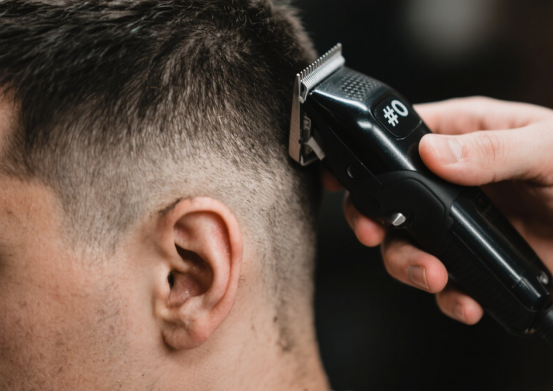
Simply put, a fade is a hairstyle where the hair gradually grows longer from the base. You’ll see a gradual transition from short hair near the neck to longer hair at the crown, creating a distinct, yet subtle, layered look. By cleverly transitioning, a fade can create a clean, fresh look that’s perfect for any occasion.
There are three common types of fade in and fade out:
Low Fade: The gradient starts just above the ears and is soft and natural. It is the safest choice and suits almost all face shapes and hair types.
Medium Fade: Starts near the temples, neither too subtle nor too radical, suitable for most people.
High fade: Starting from the top of the head, this hairstyle gives a bold and cool feeling, and is more suitable for young people or those who like a high-profile personality style.
Who is suitable for fade hairstyle?
Basically, fades are suitable for everyone, especially:
For those who want to make their face more three-dimensional: The gradient layering can modify the face shape very well and make the overall look more layered.
People who like simple maintenance: This hairstyle does not require much maintenance and is suitable for busy professionals or those who do not want to spend time taking care of their hair.
Fashion-forward individuals: If you love trying new trends, a fade can help you express your personality, whether you go for a conservative low fade or a bold high fade.
2. Preparation: List of tools you will need
Preparation determines whether your haircut goes smoothly, so this step is very important! Make sure you have the right tools to make the haircut process easier and smoother.
Essential Tools List
Hair clippers : Hair clippers with multiple guards (such as #0, #1, #2, #3), different guard sizes help you control the gradient effect.
Scissors: Used to trim the hair on top to make the overall layering more natural.
Comb: Helps organize hair during haircutting and ensures more precise cutting.
Micro-adjustment trimmer: used to finely trim sideburns, ears and neck lines to ensure these details are cleaner and neater.
Spray bottle: Keeps hair moisturized for a more precise trim.
Cleaning tools: Brush or hair dryer, used to clean up the loose hair that falls during the haircut.
Mirror: It is a good idea to have a handheld mirror, especially when trimming the back of the head, to help check details.
Prepare in Advance
Make sure your tools are clean and charged, and that your environment is tidy and well-lit. A clean, quiet haircutting environment will allow you to focus more and achieve better results.
3. Steps: How to easily achieve a gradient hairstyle
Step 1: Set up the haircut environment
First, make sure the haircutting environment is clean, tidy, and well-lit. Have the customer (or yourself) sit down, put on a haircutting cape, and make sure the clothes don’t get dirty.
Step 2: Select the shield and determine the gradient position
Choose an appropriate mask based on the fade effect you want. For example, if you want a high fade, start with #0 or #1, choose the appropriate mask, and lock it.
Step 3: Trim from both sides
Start from above the ears, keep the hair clippers steady, and push gently from bottom to top. Remember, the technique should be gentle, the clippers should be close to the scalp, and do not use too much force, so that the transition will be natural.
Step 4: Create the Fade Line
Switch to a shorter guard (like a #0) and start trimming from the base of the head to create a clear “fade line.” Don’t worry about this line being too obvious; it’s the foundation for the transition later on.
Step 5: Trim the transition area
Switch to a slightly longer shroud (like #1 or #2) and gently trim the area above the fade line to ensure the two layers connect naturally. You can gradually increase the shroud length and use pop-up motions to smooth out the transition area.
Step 6: Trim the top of the hairstyle
The hair on top can be trimmed with scissors. Use a comb to comb the hair up and trim it in small sections to ensure a natural transition between the top and the sides with distinct layers.
Step 7: Detail finishing
Use a fine-adjustable trimmer to trim your sideburns, ears, and neck to ensure these areas are clean and sharp. This step is very important and directly affects the overall sophistication of your hairstyle.
Step 8: Check Symmetry and Details
After finishing one side, use a handheld mirror to check the other side from a different angle to see if the two sides are symmetrical and the transitions are smooth. If necessary, make minor adjustments to ensure that every part is flawless.
Step 9: Clean up the site and complete the pruning
Clean up any remaining hair and review the final result to ensure the customer is satisfied, then re-touch it if necessary.

4. Pro Tip: Ensure smooth transitions and symmetry
Keep the fader steady and even
The most important thing to avoid in transitions is a hard edge or unevenness. Therefore, try to maintain consistent fader speed and pressure. Gently smooth the transitions between each layer to ensure a seamless transition.
Grinding of transition zones
The key to a gradual effect is how you handle the transition area. After each trim, stop and check the effect. Don’t rush to finish it. Make sure the transition is smooth.
5. Common Problems and Solutions
The gradient line is not smooth:
Solution: You can change the guard several times and gradually adjust the transition to ensure natural layers. If there are hard edges, use a comb to help trim.
Asymmetry on both sides:
Solution: Use a handheld mirror to check from multiple angles, especially the back of the head, and make gradual adjustments to ensure left and right sides are consistent.
6. Advanced Technique: Customize the Gradient Effect for Different Hair Types
Curly hair vs. straight hair
The fading of curls requires special care, especially in the transition area, because the volume of the curls can blur the transition between layers. Use a gentle and careful approach when trimming, and use a comb to help define the hair.
It is relatively simple to deal with straight hair, and the gradient effect is also easy to achieve.
Matching face shape with gradient hairstyle
Round face: Choose a high fade to break the roundness and lengthen the face shape through a high gradient.
Square face: A low fade can help round out facial lines and avoid an overly harsh style.
7. Summary and Practical Tips
The key to mastering a fade is practice, adjustments, and a meticulous approach. As you work diligently, the fade will become more and more natural, ultimately resulting in a flawless look.
All-inclusive kit – Skin fade and full haircut techniques for beginners